Friday, 24 August 2012

Kolrosing a Mora 120


Kolrosing is a decorative handicraft from Scandinavia, the basic process is as simple as you like but the results are great. A bushcrafty friend of mine showed me the Kolrosing that he'd done on his mora woodcarving knife and I really liked how it improved the knife. Mora 120's are superb little knives, the blades shape really suits the kind of woodcarving that I do and it takes and holds a nice sharp edge, and the handle shape is lovely and comfortable right out of the box. The price is pretty good too, I think I paid £12 for mine (I've seen them even cheaper since), and, as with any good quality knife I fully expect it to last longer than I do. The only real downsides to the mora 120 are that the sheath that comes with it is more or less useless and the knife itself is the plainest most boring thing you could ever cast eyes upon. 


standard mora 120
(image courtesy of www.knifereviews.co.uk)

Anyway, I decided that seeing as how this is a Scandinavian knife a little Kolrosing on the handle would be just the thing to pretty it up a little. I went for a couple of fairly simple knotwork designs as it's easy to build up composite designs with knots, so the overall effect looks a lot more involved and complicated than it actually is. These knots are usually known as celtic knots but there's no real reason for that, yes the celts did use knotwork designs in things such as jewellery but then so has just about every culture on the planet, especially those with northern european links. I guess "generic northern European neo pagan knotwork" just doesn't have to same ring to it. I don't think it's finished yet, there's a little bit too much space left I think, time will decide that for me. Anyway, this is what I've got so far, feel free to let me know what you think.


Bye for now,

Stuart

Thursday, 23 August 2012

Kiridashi

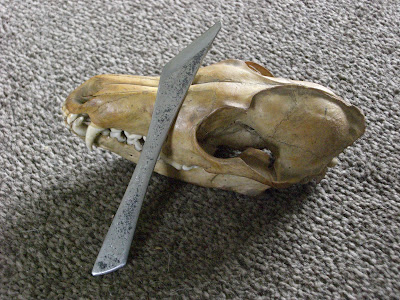
Earlier this year I decided to try my hand at knife making and decided on a Kiridashi as my first project. "What's a Kiridashi" I hear you ask, well it's a Japanese style of knife, made from one piece of metal (so the handle and the blade are made from the same piece of steel), usually without any additional handle material (although you quite often see them with a simple cord wrap), and with a chisel ground edge. They're used as woodworking knives by Japanese carpenters and woodcarvers, sometimes designed as a utility knife, something like the British tradesman's "Stanley" knife, and sometimes designed with a very specific purpose in mind. Mine was designed purely around the material that I had in the workshop at the time. I made it from one half of an old pair of garden shears that had been rusting away in the shed for years and were in desperate need a new lease of life. This knife was made using only hand tools and hardened and tempered in a home made charcoal forge with an engine oil quench.

I'm pretty pleased with how it's turned out, although I've never done any knife making before this I do have quite a bit of experience of working with hand tools and working with metals and I think the skills and techniques that I've picked up over the years really shone through here. I made mistakes, and there's bits and bobs wrong with the finished items but it's all a learning experience and hopefully I can take forward what I've learned and do an even better job next time.

Kiridashi resting on a fox skull
Making this little knife was a really fun and satisfying project, and remarkably straight forward to do. I think I'll be trying my hand at some more knife making in the future, maybe something a little more involved next time.

p.s. sorry about the poor quality of the photo, I'll try and update it as soon as I get a better one

Bye for now,

Stuart

Tools

I like tools, all sorts of tools. I like big heavy duty tools and little delicate tools. I like power tools and I like hand tools. I like multi-purpose tools and I like highly specialised tools. I like tools that I use every day and I like tools that I can't for the life of me work out what they're for. I like old fashioned tools and I like modern tools. I like tools that work first time every time like a dream and I like tools that need a day of tinkering to get working. I really like tools. Most of my hobbies involve tools of some sort, some of them pretty unique to that hobby but some of them that seem to cross over all of my hobbies. So I think that I'm probably going to be posting quite a few bits and bobs about tools on here, here's a couple of my favourite tools to get started.

Gransfors Bruks small forest axe and "Cegga" custom axe

Bye for now,

Stuart

Wednesday, 22 August 2012

Tarpology One

One of the things I like about bushcraft style camping is the use of tarps as shelters. A tarp at it's simplest is a sheet of fabric, which can be made of either synthetic or natural fibre, with webbing loops  and/or eyelets around the edge. Tarps are used mainly for shelter but they are a truely multi-purpose item, they can be used for wrapping kit, carrying, water collection, foraging, coracle making, etc. I like using tarps as shelters because of the flexibility they give me, and also because of their light weight and low bulk.

The classic way to pitch a tarp is between two trees, with the ridge more or less horizontal and the four corners stretched out to give a good pitch to the roof. I probably use this set up more than any other as it has some great advantages. 

I can get into or out of my shelter from any direction so I don't churn up any one bit of ground, I can see out in every direction so I can watch the world around me, I can hang a line under the ridge to hang all my kit from, plenty of fresh air gets through it, it provides lots of shade, I can sit up, and I can cook under my shelter. The downside to this set up is that it does very little in the way of keeping the wind out, so if it's windy and raining you have to be careful not to get wet, for that reason I nearly always use a bivi bag with this set up.

"Classic" tarp set up at a BCUK meet at Spitewinter
One way to make the "classic" set up more weatherproof is to lower the ridgeline slightly and to peg one side of the tarp down to the ground. This set up is a lot less drafty than the "classic" set up and works better when there's a combination of wind and rain, and this is just the shelter that I would choose for those conditions. The open front still allows plenty of options for access and lets me have a view out of one side at least.

Open fronted set up on my birthday 2011
A natural progression from the open fronted set up is the low profile set up, with this shelter the ridgeline is even lower with both sides of the tarp touching, or almost touching, the ground. This set up is better still at keeping the weather off and does a good job of retaining your body heat through the night. 

The disadvantages of this shelter are the same as with the open-fronted set up, only more so. The view is more or less non existent, access is severely restricted, there's not much space inside, etc. I only really use this type of shelter for quick overnight camps where I'll be striking camp first thing in the morning so only really need a shelter to keep me and my kit dry whilst I sleep. 

It's probably the quickest and easiest of set ups that I use regularly, the shelter below was set up at about 2a.m. on a really frosty winters morning with a belly full of beer and lots of "helpful" advice from friends. Even facing such difficulties it was still only a five minute job to set up. 

Low Profile set up on my birthday 2012
An even more weatherproof set up is the one below, this time the ridge of the tarp goes straight down to the ground at the back of the shelter (no ridgeline's used for this one), and the back corners are stretched out tight so that one side of the tarp is flat to the floor. With the back of the shelter into the wind, and with the tarp pegged tightly to the ground this set up will keep off all but the very worse of the British weather. 

As you can see from the pictures below I can use this set up quite easily without trees as long as I've got at least one pole, here I'm using my walking staff. the combination of tree-free set up and good weather protection makes this my set up of choice for a night on the moors. 

The downsides to this set up are; not a great deal of space to sit up, it can get hot and stuffy inside, condensation invariably forms on the underside of the tarp, you can only get in and out one way, there's not much of a view, and it needs lots of pegs (15 in total but it'll work with 9 on good ground).  The feature of this set up that makes it superior to most others is the fact that in the wettest and windiest of weather I can still have warm and weatherproof shelter in a couple of minutes, and that could possibly be a life-saver one day.

Front yard tarpology (the neighbours have got used to me!)

An idea of how steeply the roof slopes, it's only about 12" from the ground in the middle

These are the four set ups that I use most often, there are lots more ways to set up a tarp, and sometimes I use some of those too, but these four cover 95% of situations for me. I'll be posting quite a bit more about tarps I reckon, it's a big topic.

Bye for now,

Stuart