 |
| (Image courtesy of Gary Waidson www.ravenlore.co.uk) |
During a recent weekend away with some friends from BCUK, Paul Kirtley of Frontier Bushcraft took time out to give us a few hints and tips for setting up larger tarps. These larger types of tarps would most likely get used in a base camp situation, or to provide large sheltered communal areas for groups of people. One of the problems associated with using big tarps is that they can be quite heavy, especially once they get wet, so the methods that get used for setting up lightweight tarps (like this) just aren't up to the job. Heavy tarps call for a lot more load bearing ability on the ridgeline to prevent sagging and to enable the tarp to be set up tautly enough to properly shed rain. To get that load bearing ability two things are needed; a much stronger ridgeline, and a method of tying up that ridgeline that provides more mechanical advantage to provide lots of tension.
The method that Paul demonstrated is one of the best known, and has been described and illustrated extensively in the past, I just happened to have access to some pretty good photo's of Paul's demonstration so thought I'd share them.
 |
| (Image courtesy of Chris Leeland) |
The rope that Paul used for this demonstration was 11mm static kernmantel rope, the kind that cavers and tree climbers use a lot, dynamic rope (the kind that rock climbers use) wouldn't be suitable for this method as it's too stretchy. Thinner static rope would be fine, 9mm kernmantel rope has a breaking strain of over 3000kg, even with the mechanical advantage provided by the tensioning system, 3 tonnes+ still takes a lot of breaking. The karabiner is just a standard screw gate type.
One end of the rope is secured to a tree with a timber hitch. In all honesty this is a method that had never occured to me to use before but it's one that I will be using in the future as it's ideally suited to the purpose. It's really easy to tie, it won't slip under tension, it won't come undone when the tarp's flapping wildly in the wind, it won't swell up and jam when wet, and it's really easy to untie when you come to pack away, it was one of those "why didn't I think of that" moments.
 |
| (Image courtesy of Chris Leeland) |
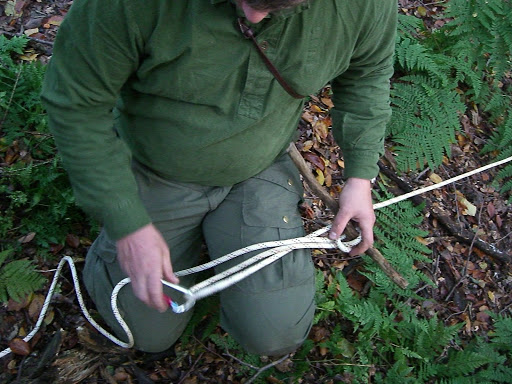
The other end of the rope is passed once around another tree and secured and tensioned using a variation of the trucker's hitch. The first stage is to make two bights in the rope, creating an "S" shape, much like tying a sheepshank. Stage two also mirrors the sheepshank; a loop is made in the standing part of the rope and the bight of the "S" nearest to that end is passed through it, being careful to ensure that the loop is twisted in the right direction and that the bight passes through the loop from the correct side. You've now got something resembling half a sheepshank. Hopefully the images below help to clarify things a little.
 |
| (Image courtesy of Chris Leeland) |
 |
| (Image courtesy of Chris Leeland) |
A stick is then placed through the bight and the bight is pulled tight against it. Although not strictly necessary this provides a little extra security and helps to ensure that the hitch doesn't collapse under tension.
 |
| (Image courtesy of Chris Leeland) |
 |
| (Image courtesy of Chris Leeland) |
Stage three is to insert a karabiner into the bight that's pointing towards the live end of the rope, the main purpose of the karabiner is that it greatly reduces the friction on the rope whilst it's being tensioned, an added bonus is that, especially when using long ropes, it makes the hitch much simpler to tie.
 |
| (Image courtesy of Chris Leeland) |
 |
| (Image courtesy of Chris Leeland) |
All that's left is to apply tension to the live end of the rope and to tie it off however you see fit. I don't have a photo of the hitch being tied off at the moment, I'll add one as soon as I can.
Bye for now,
Stuart
now I need to learn the knots!
ReplyDeleteThanks for the comment Elen,
DeleteI'll try and do a few tutorials on the different knots that I use for rigging tarps at some point soon, watch this space.
All the best,
Stuart
Good stuff Stuart, and just what I need for the BCUK Bushmoot next week - thanks!
ReplyDeleteNo problem Dave, glad you found it helpful. Have a good trip to the moot.
DeleteAll the best,
Stuart.
Thanks for sharing Stuart, nice work! Do you know the type of tarp being used in the 1st picture?
ReplyDeleteSorry Tom but I don't, the photo was taken on a course weekend so there's kit belonging to a number of different people in that photo.
DeleteAll the best,
Stuart.
A most excellent blog Stuart. Remember the weekend well. Seems so long ago now.
ReplyDelete